
 By Nila Kartika Wati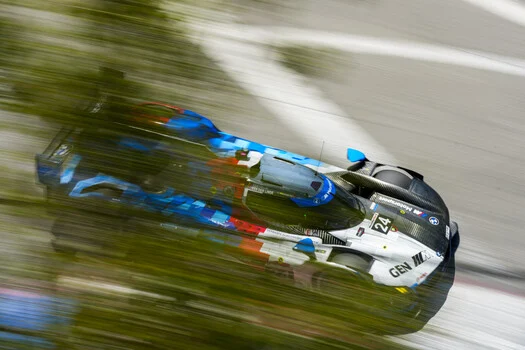
Panning, a foundational technique in sports and action photography, transcends its traditional applications to infuse dynamism and intrigue across a multitude of photographic genres. Its mastery allows photographers to transform static images into vibrant narratives, conveying speed and movement while maintaining sharp focus on the subject. This comprehensive guide delves into the intricate considerations and technical proficiencies required to consistently produce compelling panning images, moving beyond basic principles to explore advanced applications and best practices.
I. The Conceptual Foundation: Defining the Desired Outcome
A successful panning shot begins not with camera settings, but with a clear conceptualization of the desired final image. Photographers must first determine the precise degree of motion blur required, weighing artistic intent against practical client specifications. This initial assessment dictates the subsequent technical choices. For instance, an artistic, abstract aesthetic might demand significant background and even subject blur, whereas a commercial client may require a tack-sharp subject with legible details (such as sponsor decals on a race car) while still conveying motion through a blurred background.
The intended use of the photograph is paramount. In professional motorsport photography, for example, client requirements often prioritize a crisp subject for promotional materials, necessitating faster shutter speeds to ensure clarity. Once such a baseline image is secured, a photographer might progressively experiment with slower shutter speeds to achieve more pronounced artistic blur for editorial or personal projects. The inherent speed of the subject is another critical factor; capturing a vehicle in dense city traffic presents a distinctly different challenge—and requires different settings—than photographing a high-speed race car on a circuit, a nuance that, if overlooked, can lead to considerable frustration and inconsistent results. Understanding this initial conceptual phase is crucial for aligning technical execution with artistic or commercial objectives.
II. Strategic Positioning: Geometry, Orientation, and Environmental Considerations
The physical relationship between the photographer, the subject, and the environment plays a decisive role in the efficacy of a panning shot. Key geometric principles and environmental factors must be carefully considered to optimize results.
A. Angle of Approach and Subject Velocity:
The direction of the subject’s travel relative to the photographer is fundamental. A high-speed subject moving perpendicularly across the frame at a close distance generally presents a greater challenge than one moving through an arcing corner at a more considerable distance. The latter allows for a longer, more consistent tracking motion, easing the demands on precise camera movement. Photographers are advised to position themselves where the subject’s movement is predictable and its speed consistent. For urban street photography, this might involve selecting a vantage point near an intersection or a crosswalk, enabling a smooth track of pedestrians or vehicles.
B. Distance and Focal Length:
Maintaining an optimal distance from the subject is vital, particularly for those new to panning. Greater distance reduces the angular velocity the camera must track, allowing for smoother, less rushed movements. In crowded urban settings where space is limited, wide-angle lenses can prove advantageous, providing a broader field of view without requiring excessive camera movement. Conversely, sports and motorsport photography frequently necessitate longer telephoto lenses due to environmental constraints (e.g., trackside barriers) and the requirement to capture intricate details from afar. Telephoto lenses also inherently compress the background, enhancing the visual effect of motion blur.
C. Surface Dynamics:
The terrain over which the subject travels is an often-overlooked but critical factor. Racetracks, for instance, may feature bumpy sections. Attempting to pan a race car over such undulations at very slow shutter speeds (e.g., 1/20 or 1/10 of a second) can introduce vertical motion blur, degrading the sharpness of the subject even if horizontal tracking is perfect. This phenomenon underscores the need for photographers to account for all dimensions of subject movement and adjust shutter speeds accordingly to mitigate unwanted vertical displacement.
III. Technical Mastery: Camera Settings and Focusing Methodologies
With conceptual clarity and strategic positioning established, the focus shifts to the precise manipulation of camera settings to achieve the desired effect. The overarching goal of panning is to convey motion, and shutter speed remains the primary determinant of this effect.
A. Shutter Speed: The Core of Motion Blur:
The choice of shutter speed is intrinsically linked to the subject’s velocity and the desired intensity of blur. For fast-moving subjects such as race cars, an initial shutter speed of 1/120th of a second provides a good starting point, allowing for a discernible blur while offering a reasonable chance of subject sharpness. This can then be adjusted slower (e.g., 1/60s, 1/30s, 1/15s) for more pronounced blur or faster for less. Critically, for vehicles, the wheels must exhibit motion blur; a frozen wheel conveys a sense of the car being parked rather than in motion. For slower-moving subjects like city traffic, a starting shutter speed of 1/40th of a second is often appropriate. Pedestrians, moving at significantly slower speeds, typically require even slower shutter speeds, with 1/15th of a second serving as an effective baseline for noticeable background blur.
B. Aperture: Controlling Depth of Field and Light:
While shutter speed dictates motion blur, aperture controls the depth of field and the amount of light entering the lens. When panning fast-moving subjects, particularly at slower shutter speeds, a wide-open aperture (e.g., f/2.8 or lower) creates a very shallow plane of focus, making it exceedingly difficult to keep the subject consistently sharp. Opting for a narrower aperture, such as f/8, f/10, or higher, significantly increases the depth of field, providing a larger margin for error and a greater probability of achieving a sharp subject within the blurred background. This is particularly beneficial for photographers refining their panning technique.
C. ISO: Managing Light Sensitivity:
ISO sensitivity must be balanced with shutter speed and aperture to achieve correct exposure, especially in varying light conditions. During daylight hours, when slow shutter speeds and narrow apertures are employed, ISO can often be kept at its base setting (e.g., ISO 100 or 200) to minimize digital noise. However, in low-light scenarios, a higher ISO may be necessary to maintain a sufficiently fast shutter speed (to avoid excessive blur) or to allow for a narrower aperture, introducing a trade-off between noise and desired motion blur. Modern cameras, with their improved high-ISO performance, offer greater flexibility in this regard.
D. Focusing Methodologies: Autofocus vs. Manual Focus:
The choice between autofocus (AF) and manual focus (MF) depends heavily on the camera’s capabilities, the subject’s predictability, and the photographer’s experience. Modern camera autofocus systems, particularly those with continuous AF (AI Servo/AF-C) and sophisticated tracking modes, can be remarkably effective even with very fast-moving subjects. These systems are designed to predict subject movement and maintain focus.
Alternatively, manual focus, often combined with zone focusing, can be highly effective. This involves pre-focusing on a specific area where the subject is anticipated to pass and then initiating the pan as the subject enters that pre-focused zone. This technique pairs particularly well with a narrower aperture (f/8 or higher) to ensure a larger depth of field, increasing the likelihood of the subject remaining within the sharp plane. For beginners, manually focusing on a specific area and employing a larger plane of focus offers a robust starting point, simplifying one aspect of the complex panning equation.
E. Exposure Modes for Learning:
For those new to panning, starting in Shutter Priority (Tv or S mode) is highly recommended. This mode allows the photographer to set the desired shutter speed, with the camera automatically adjusting aperture and ISO to achieve correct exposure. By reviewing images and noting the aperture and ISO values chosen by the camera for successful shots, photographers can gradually build an intuitive understanding of the interplay between settings. As proficiency grows, transitioning to full Manual mode offers complete creative control over all exposure parameters.
IV. Ergonomics and Execution: Body Position and Camera Movement
Beyond technical settings, the physical execution of the pan is critical. Achieving a smooth, consistent camera movement while tracking a subject demands meticulous attention to body position and handling.
A. Stability as the Foundation:
A stable platform is non-negotiable. Photographers should strive to maintain a balanced stance, tucking elbows tightly against the body to minimize extraneous movement. If necessary, kneeling, leaning against a sturdy structure (e.g., a wall, fence), or utilizing a monopod for longer, heavier lenses can significantly enhance stability. A monopod is particularly beneficial for mitigating arm fatigue and reducing vertical camera shake, which can ruin a slow-shutter-speed pan.
B. The Art of Smooth Tracking:
The essence of panning lies in moving the camera smoothly along a single horizontal axis, precisely matching the subject’s speed and direction. Any deviation, such as an arcing motion or vertical displacement, will result in an unsharp subject. The movement should originate from the hips and core, creating a fluid, rotational pivot rather than relying solely on arm movement. This technique allows for a more consistent and controlled sweep.
C. Lens Holding Techniques:
The method of holding the camera and lens varies based on equipment and personal preference. For smaller, lighter lenses, supporting the lens base where it attaches to the camera with the non-dominant hand provides adequate stability. With longer, heavier telephoto lenses (e.g., 70-200mm or longer), supporting the lens barrel or even the lens hood with the non-dominant hand, while gripping the camera body with the dominant hand, often provides better balance and control. Experimentation is encouraged to discover the most comfortable and stable grip for individual photographers and their specific gear. Consistent practice builds muscle memory, transforming conscious effort into intuitive, fluid motion.
V. Essential Gear: Accessories for Enhanced Control and Creativity
While the core elements of panning involve camera settings and technique, certain accessories can significantly expand creative possibilities and overcome common challenges.
A. Neutral Density (ND) Filters:
ND filters are indispensable when attempting slow-shutter-speed panning during bright daylight conditions. By reducing the amount of light entering the lens, ND filters allow photographers to select very slow shutter speeds (e.g., 1/15s, 1/8s, or even slower) without overexposing the image. Without an ND filter in bright light, achieving such slow shutter speeds would necessitate an extremely narrow aperture (e.g., f/22 or higher), which can lead to diffraction and a loss of image sharpness. Variable ND filters offer flexibility by allowing adjustment of the light reduction, while fixed ND filters provide consistent results for specific light conditions.
B. Circular Polarizers:
A circular polarizer (CPL) is another valuable accessory, particularly for photographing vehicles. Beyond reducing glare and reflections on shiny surfaces like car windshields and paintwork, a CPL can also enhance color saturation and contrast, making skies deeper and foliage richer. Some CPLs are also designed to function as light ND filters, offering a dual benefit.
C. Image Stabilization (IS) Modes:
Many modern lenses and camera bodies feature image stabilization (IS) systems. For panning, it is crucial to understand and correctly utilize the IS modes. Most IS systems offer a dedicated "panning mode" (often Mode 2), which stabilizes vertical movement while allowing horizontal movement to remain unstabilized, thereby assisting in creating a smooth pan without fighting the desired motion. Using the standard IS mode (Mode 1) during panning can actually hinder the process by attempting to stabilize both axes, potentially leading to ghosting or an unnatural look.
D. Monopods and Tripods with Gimbal Heads:
As previously mentioned, a monopod is an excellent tool for stability, especially with heavy telephoto lenses, reducing arm fatigue and aiding in smooth horizontal tracking. For extremely slow shutter speeds or highly precise tracking, a tripod equipped with a gimbal head can provide unparalleled stability and fluidity of motion. Gimbal heads are specifically designed to balance heavy lenses, allowing for effortless tracking of moving subjects with minimal friction.
VI. Challenges, Common Pitfalls, and Refinement
Even experienced photographers encounter challenges with panning. Common pitfalls include inconsistent blur, a subject that is not tack sharp, or unwanted ghosting effects. Inconsistent blur often stems from irregular camera movement or variations in the subject’s speed. A soft subject usually indicates a failure to maintain focus or an insufficient shutter speed relative to the subject’s movement and desired sharpness.
Utilizing continuous burst mode (high-speed continuous shooting) is highly recommended. This allows photographers to capture a sequence of images during a single pan, significantly increasing the probability of securing a perfectly sharp subject within the desired blur. Post-processing can refine panning shots, but it’s crucial to understand that fundamental errors in technique (e.g., a completely missed focus) cannot be corrected. Minor adjustments to contrast, color, and perhaps very slight cropping (being mindful that cropping too much can diminish the sense of motion) can enhance the final image.
VII. The Broader Impact: Elevating Photographic Storytelling
Mastering panning extends beyond mere technical proficiency; it profoundly impacts a photographer’s ability to tell stories and evoke emotion. By introducing a sense of dynamism, panning transforms static moments into vibrant, energetic scenes. This technique is invaluable for capturing the thrill of a race, the hustle of urban life, or the grace of wildlife in motion. It allows photographers to draw the viewer’s eye, guiding them through the image and emphasizing the subject’s journey.
For professional photographers, adding panning to their repertoire significantly enriches their portfolio, demonstrating versatility and artistic vision. This skill is highly sought after across various commissions, from sports journalism and automotive advertising to editorial work and fine art. Beyond its professional utility, the pursuit of mastering panning reinvigorates a photographer’s passion for the medium, encouraging experimentation and fostering a deeper understanding of light, motion, and composition.
In conclusion, while panning presents a steep learning curve, the rewards—visually arresting images that pulse with energy and narrative—are substantial. The considerations outlined here serve as a robust framework, but genuine mastery is forged through persistent experimentation, continuous practice, and an unwavering commitment to refining one’s craft. Embracing panning, whether in the realm of high-speed sports or the quiet rhythm of street photography, offers a powerful avenue for creative expression and an exciting challenge for any photographer seeking to elevate their visual storytelling.
