
 By Nila Kartika Wati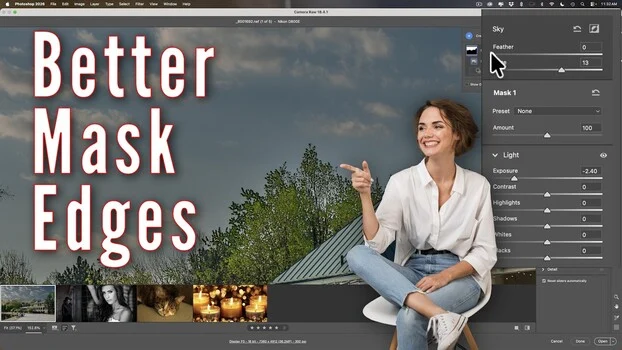
Adobe Camera Raw has discreetly rolled out a suite of powerful new tools designed to significantly enhance the precision and flexibility of image adjustments, addressing long-standing challenges faced by photographers and retouchers. These updates, highlighted by the introduction of dedicated mask refinement sliders and the integration of local color grading, represent a pivotal shift in Adobe’s approach to non-destructive editing, pushing advanced capabilities further into the foundational stages of post-production. The enhancements are poised to streamline workflows, reduce the need for round-trips to other applications like Photoshop, and empower users with unprecedented granular control over their images.
Precision Masking: The Advent of Edge and Feather Sliders
At the forefront of these new functionalities are two crucial sliders: ‘Edge’ and ‘Feather,’ now available within specific AI-powered mask types. For years, a common frustration among photographers has been the inability to perfectly delineate mask boundaries, particularly around intricate details such as foliage, hair, or complex architectural elements. Masks generated by automated selection tools, while remarkably efficient, often fell just short of the desired edge or extended slightly beyond it, necessitating tedious manual refinements or complex layering. The new ‘Edge’ and ‘Feather’ sliders directly confront this issue, offering a dedicated mechanism to precisely expand or contract a mask and control the softness of its transition.
When applying a mask, particularly those generated for ‘Sky,’ ‘Subject,’ ‘Background,’ ‘Landscape,’ or ‘People,’ users will now observe these two sliders appearing in the mask adjustment panel. The ‘Feather’ slider operates much as its name suggests, allowing for a softening or hardening of the mask’s boundary. This is critical for creating natural transitions between an adjusted area and the rest of the image, preventing abrupt changes that can disrupt visual coherence. Conversely, an overly aggressive application of feathering can lead to undesirable "haloing," where the adjustment bleeds into unintended areas, creating a soft, blurry edge that lacks definition.
The ‘Edge’ slider, however, introduces a novel level of control. It enables users to either expand the mask outward, pushing the adjustment slightly past the initial AI-generated selection, or contract it inward, effectively "choking" the mask to prevent bleed into the subject or background. This dual functionality is invaluable for correcting those subtle inaccuracies that often plague automated selections. For instance, in a demonstration scenario involving a stand of trees against a bright sky, a mask might initially miss a few fine branches or create a slight fringe around the canopy. The ‘Edge’ slider allows for micro-adjustments to perfectly encompass these elements or pull back the selection where it has inadvertently extended too far. Without this tool, achieving such precision often required painstaking manual brushwork or the use of more complex masking techniques in Photoshop, consuming valuable time. The ability to quickly expand or contract a mask ensures that adjustments, such as localized exposure changes or color shifts, apply precisely where intended, eliminating artifacts like light halos around dark subjects or dark fringes around bright ones.
These mask refinement sliders are currently exclusive to Camera Raw and are not yet present in any version of Lightroom. This initial rollout strategy underscores Adobe’s iterative development process, often introducing features first in Camera Raw for professional users who frequently integrate it with Photoshop workflows, before wider deployment across the Lightroom ecosystem.
The Revolution of Local Color Grading Within Masks
Perhaps the most significant and creatively impactful update is the integration of color grading capabilities directly into the masking panel. Historically, color grading in Camera Raw was a global adjustment, applied uniformly across the entire image via the dedicated color wheels in the edit panel. While powerful for establishing an overall mood or aesthetic, this global application limited the ability to selectively color-tone specific regions without resorting to complex layering and blending modes in Photoshop. The new implementation fundamentally alters this paradigm.
With color grading now living inside the masking panel, photographers can apply targeted color adjustments to distinct areas of an image while leaving others untouched. This opens up a vast new realm of creative possibilities and workflow efficiencies. Consider a portrait photographer aiming to achieve a specific atmospheric effect. Previously, altering the color temperature or tint of a background independently of the subject would typically involve creating a mask, duplicating the layer, applying a global color grade, and then carefully blending or masking out the subject – a multi-step process. Now, a ‘Background’ mask can be generated, and the full suite of color grading tools (shadows, midtones, highlights, global) can be applied only to that masked region.
A compelling demonstration illustrates this power: imagine a portrait where the background is intentionally desaturated to black and white, while simultaneously introducing a warm yellow tint into its midtones and highlights, and a cool blue into its shadows. Concurrently, the foreground subject remains in full, natural color. This level of selective color manipulation, once a hallmark of advanced compositing, is now achievable non-destructively within Camera Raw with a few clicks.
Another striking example showcases the artistic potential: a monochrome portrait where only the subject’s eyes are color-graded blue. By creating a ‘People’ mask, then refining it to specifically target the iris and pupil, the color grading wheels can be used to introduce a vibrant blue into the shadows and midtones of the eyes. This deliberate, almost surreal effect, highlights the extent to which targeted grades can be pushed when color grading and masking are intrinsically linked. It moves beyond simple corrective adjustments into the realm of stylized artistic expression, mirroring techniques long employed by colorists in the film and video industry.
This integration democratizes advanced color manipulation, making complex stylistic choices accessible to a broader range of photographers without requiring an expert-level understanding of Photoshop layers or intricate masking techniques. It embodies Adobe’s ongoing strategy of empowering users with sophisticated tools in an intuitive, non-destructive environment.
Extended White Balance Range: More Control Over Color Temperature
While less dramatic than the masking and color grading enhancements, a subtle yet significant update to the white balance functionality offers greater control over an image’s color temperature. The temperature slider for raw files previously bottomed out at 2,000 Kelvin, which, in certain extreme lighting conditions (e.g., very cool ambient light, specific LED setups, or artistic intent), could still leave an image warmer than desired. The updated slider now extends down to 1,500 Kelvin, providing an additional 500 Kelvin of range on the cooler end. This increased range is invaluable when attempting to neutralize or intentionally cool down an image that was captured under extremely warm conditions, or when pushing creative boundaries with cooler tones.
For non-raw files (such as JPEGs or TIFFs), which use a relative temperature scale (e.g., -100 to +100), the cool end of the slider has also been extended. Previously, this range might have run from minus 100 to plus 100. Now, the cool end stretches to minus 150, while the warm end remains at plus 100. This expansion on the blue side of the slider provides crucial additional corrective power for JPEGs or TIFFs that might have reached their correction limit before achieving the desired color balance. This ensures that even highly compressed or pre-processed files can benefit from a greater degree of white balance adjustment within Camera Raw, reducing the likelihood of needing external tools for final color correction.
Adobe’s Strategic Vision: The Broader Shift Towards Localized Control
These recent updates are not isolated features but rather integral components of a wider strategic shift that Adobe has been meticulously implementing across its raw editors for several years. The overarching philosophy involves progressively moving capabilities traditionally categorized as "global adjustments" into the highly precise and targeted domain of the masking panel. This evolution began with the integration of tone and color controls into masks, allowing photographers to adjust exposure, contrast, highlights, shadows, saturation, and hue for specific masked regions. The latest addition of the full color grading wheels marks a significant milestone in this journey.
This strategy is deeply rooted in the principles of computational photography and the increasing sophistication of Adobe’s Sensei AI engine. Smart masks for ‘Sky,’ ‘Subject,’ ‘Background,’ ‘Landscape,’ and ‘People’ leverage advanced machine learning algorithms to intelligently identify and select complex regions within an image. By coupling these intelligent selections with granular adjustment tools, Adobe empowers users to perform highly complex, localized edits with remarkable ease and speed.
The practical takeaway for photographers is profound: images can now be "built" or "graded" in layers, treating each mask not merely as a simple brightness fix but as a comprehensive, targeted adjustment pass. This mirrors the sophisticated workflows long established in professional video color grading, where colorists routinely split and manipulate shadows, midtones, and highlights across different regions of a frame to achieve a desired aesthetic. Bringing this advanced thinking into still image editing means a photographer can, for example, subtly warm a subject’s skin tones while simultaneously cooling the background to create depth and separation, all within the same Camera Raw file and without the laborious round-trips to Photoshop that were once the only viable option.
Implications for Photographers and Industry Workflow
The implications of these enhancements are far-reaching for various photographic disciplines. For portrait photographers, the eye and background examples directly translate into real-world applications, enabling nuanced control over mood, subject isolation, and stylistic expression. Product photographers can achieve precise color accuracy and separation between product and environment. Landscape photographers gain unprecedented control over specific elements like skies, foregrounds, and distant features, allowing for detailed atmospheric shaping.
This continuous refinement of Camera Raw’s capabilities solidifies its position as a powerful, standalone post-processing engine, reducing the dependence on Photoshop for complex masking and compositing tasks. It accelerates workflows for professional retouchers and high-volume editors, saving significant time by allowing more work to be completed non-destructively at the raw processing stage. Furthermore, by democratizing access to advanced color grading techniques, Adobe empowers a broader spectrum of photographers to achieve professional-grade results, fostering greater creative experimentation and pushing the boundaries of what is achievable within a single editing application.
From an industry perspective, these updates demonstrate Adobe’s commitment to continuous innovation in its flagship photography products, maintaining its competitive edge against a growing landscape of powerful editing software. The iterative release of features, often starting with Camera Raw and then expanding to Lightroom, showcases a responsive development cycle attuned to the evolving needs of the photographic community.
These transformative updates to Adobe Camera Raw signify a significant leap forward in non-destructive image editing, offering unparalleled precision in masking and empowering photographers with advanced localized color grading capabilities. The integration of these tools into the core raw processing workflow streamlines operations, expands creative horizons, and sets a new standard for efficient and sophisticated image manipulation. Photographers are encouraged to explore these new features, available now, to unlock their full creative potential. A comprehensive walkthrough by Anthony Morganti provides an excellent real-time demonstration of each slider and its practical application, offering invaluable insights into mastering these powerful new tools.
