
 By Nila Kartika Wati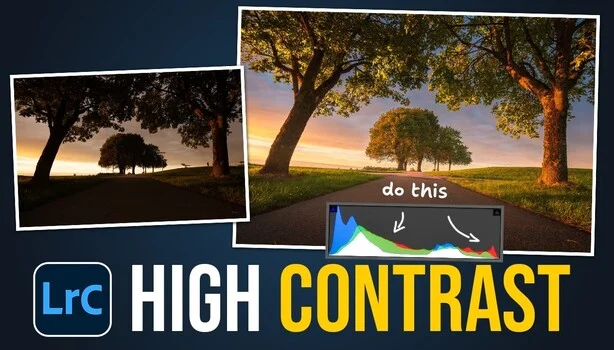
The intricate art of landscape photography, particularly when capturing the ethereal beauty of a sunset, often presents a formidable challenge: preserving detail across a vast dynamic range. Photographers frequently grapple with the dilemma of crushing shadows into impenetrable black or burning highlights into featureless white, losing critical information at both ends of the tonal spectrum. However, a meticulous methodology championed by renowned photographer Christian Möhrle offers a sophisticated solution, demonstrating how to elevate contrast dramatically without introducing clipping. Through a detailed walkthrough of a warm sunset scene in Adobe Lightroom, Möhrle illustrates a refined process centered on precise local adjustments and advanced masking, a technique reminiscent of traditional darkroom artistry but empowered by modern digital tools.
The Perennial Challenge of High-Contrast Scenes
Sunset landscapes are a celebrated motif in photography, cherished for their vibrant colors, dramatic light, and emotive qualities. Yet, these very elements contribute to their inherent photographic difficulty. The human eye possesses a remarkable ability to perceive detail across an incredibly wide range of light intensities, far exceeding the capabilities of even the most advanced digital camera sensors. This disparity, known as dynamic range, means that while a photographer’s eye might comfortably discern detail in both the brilliantly lit sky and the deeply shadowed foreground of a sunset, a camera sensor often struggles to record both simultaneously within a single exposure.
Historically, photographers have employed various in-camera techniques to mitigate this issue, such as using graduated neutral density (GND) filters to darken the sky, or capturing multiple exposures (bracketing) to later blend into a high dynamic range (HDR) image. While effective, these methods often require significant foresight and technical execution in the field. Post-processing, therefore, becomes an indispensable stage in achieving a final image that faithfully represents the scene’s emotional impact while retaining all critical visual data. The challenge is to enhance the visual ‘punch’ – the dramatic contrast that makes a sunset feel alive – without sacrificing the delicate nuances within the brightest highlights and darkest shadows. This is where Möhrle’s systematic approach, leveraging the granular control offered by modern editing software, provides a comprehensive framework.
From Darkroom Dodging and Burning to Digital Masking
Möhrle’s philosophy of local control over global sliders is not a novel concept but rather a sophisticated evolution of time-honored darkroom practices. For generations, master printers in traditional darkrooms meticulously "dodged" (held back light) and "burned" (added light) to specific areas of photographic prints under an enlarger. This painstaking process allowed them to selectively lighten shadows, darken highlights, and enhance local contrast, bringing out details and textures that a single global exposure could not capture. The goal was always to achieve a print that carried tone across its full range, from the deepest blacks to the brightest whites, with discernible detail throughout.
The advent of digital photography and subsequent development of powerful editing software like Adobe Lightroom and Photoshop have revolutionized this process. What once required specialized equipment, chemical baths, and hours of manual labor can now be achieved with far greater precision, speed, and non-destructive flexibility. Lightroom’s advanced masking panel, in particular, stands as a testament to this evolution, offering photographers an intuitive and powerful interface to apply adjustments selectively to specific regions of an image. Möhrle’s technique, therefore, can be seen as a direct digital translation and amplification of this classic darkroom logic, allowing for an unprecedented level of control and artistic expression. This paradigm shift has democratized advanced image manipulation, making professional-grade results accessible to a broader spectrum of photographers.
Christian Möhrle’s Method: A Chronological Deconstruction
Möhrle’s approach is characterized by its sequential precision, beginning with fundamental clean-up and global adjustments, and systematically progressing to intricate local refinements.
-
Initial Cleanup and Foundational Exposure: The process commences with the removal of distracting elements, a crucial step in preparing the canvas. Möhrle expertly utilizes Lightroom’s ‘Remove’ tool, set to its generative AI mode. This allows for intelligent content-aware filling, effectively erasing unwanted spots and seamlessly integrating the surrounding textures and tones. Following this, he undertakes a meticulous analysis of the image’s histogram, which serves as a visual representation of the tonal distribution. In the example scene, the histogram already indicates a broad tonal range, stretching from near-black to near-white. A common impulse might be to simply raise the global exposure; however, Möhrle demonstrates that this immediately triggers clipping warnings at both ends, indicating a loss of detail. His strategic counter-move involves a precise calibration: pulling down the highlights until detail is fully recovered in the brightest areas, while simultaneously lifting the shadows and blacks to open up the darker regions. The overarching objective at this initial stage is to establish a pristine histogram, free of any clipped information, laying an uncompromised foundation for all subsequent adjustments. This detail-first approach ensures that no information is irrevocably lost before any creative enhancements are applied.
-
Deliberate Contrast Building and Tonal Refinement: With the base exposure meticulously set to preserve all detail, Möhrle begins the deliberate reintroduction of contrast. This phase is marked by judicious application of global sliders, always with an eye on the histogram and the Alt/Option key for visual clipping indicators. He nudges the ‘Whites’ slider upwards, constantly monitoring for the precise point where clipping begins, then subtly backs off. This restraint is critical, as subsequent masking operations will inherently add brightness, and over-pushing global sliders prematurely can lead to irreversible clipping. A crucial creative decision at this stage involves white balance: Möhrle intentionally cools the overall temperature to introduce a subtle blue tint into the upper sky while preserving the inherent warmth lower in the frame, particularly around the sun. This creates a pleasing color dichotomy. He then enhances vibrancy and saturation, carefully boosting the colors without making them appear artificial. Significantly, instead of increasing clarity—a common but often harsh approach for landscapes—Möhrle makes a counterintuitive move: he lowers both clarity and dehaze. This specific adjustment, when applied to the warm light of a sunset, introduces a soft, ethereal glow, transforming the scene into something more painterly and atmospheric. The visual "before-and-after" clearly validates this seemingly unconventional choice.
-
The Power of Local Control: Advanced Masking Techniques: The true depth and drama of the image are unlocked during the masking stage, where Möhrle employs a sophisticated array of local adjustments.
- Sky Enhancement: He targets the deep blues of the sky with a ‘Color Range Mask’, meticulously isolating those specific hues. To ensure the foreground remains untouched by this adjustment, he subtracts a ‘Linear Gradient’. Within this masked area, he cools the temperature further, intensifying the richness and depth of the blues. To prevent any over-exposure in the brightest parts of the sky, each brightening move is paired with a slight reduction in highlights, a testament to his balanced approach.
- Foreground Guidance: A second ‘Linear Gradient’ is applied to the near foreground, subtly darkening it. This strategic darkening serves a dual purpose: it grounds the image and acts as a visual lead-in, guiding the viewer’s eye deeper into the scene.
- Midground Illumination: To introduce brightness and emphasis to the middle ground, Möhrle employs a large ‘Radial Gradient’. Crucially, he places the center of this gradient outside the frame, allowing for a broader, more diffuse brightening effect across the desired area. To protect specific elements within this brightened zone, such as a shadowed tree, he uses an ‘Object Mask’, drawn simply as a rectangle, and subtracts it from the radial gradient. This demonstrates the layered precision possible with masking.
- Sunlit Detail Isolation: For the most intricate detail, such as the sunlit leaves on a tree, he combines a ‘Color Range Mask’ (targeting the warm hues of the sunlit foliage) with a ‘Brush Mask’, carefully painting over the desired areas. This intersection ensures that only the specific sunlit leaves receive a lift in brightness, preventing spillover into other regions. This meticulous combination of masks allows for surgical precision in local adjustments.
-
Refining the Aesthetic: Color Grading and Finishing Touches: The final stages involve sophisticated color grading and subtle global refinements to unify the aesthetic.
- Hue Adjustments: Möhrle shifts the orange hues slightly towards red, enriching the warmth of the sunset. Simultaneously, he subtly pulls purple tones out of the blues, ensuring a cleaner, more defined blue sky.
- Saturation and Luminance: He boosts warm saturation to intensify the sunset’s glow while selectively lifting the cold blues for a balanced palette. Using the luminance tab, he carefully intensifies the highlights, adding sparkle without clipping.
- Split Toning: This technique is employed with a bold hand. He applies a strong warm hue to the highlights, creating a distinct golden glow, and a more restrained warm tone to the midtones, ensuring a harmonious transition.
- Calibration and Sharpening: A final touch in the ‘Calibration’ tab allows for subtle, overarching color shifts that refine the entire image’s palette. The process concludes with selective sharpening, applied only to the sky using a mask, ensuring crispness where it matters without introducing noise or artifacts into other areas.
The Principle of Restraint and Cumulative Impact
The fundamental principle underpinning Möhrle’s entire editing philosophy is the judicious application of local control and the cumulative effect of small, precise adjustments. Every time he brightens one region, he thoughtfully considers and often compensates in another. This iterative process is how the final image achieves an overall high-contrast feel, yet every individual area meticulously retains its detail. This approach stands in stark contrast to the common pitfall of relying on aggressive global sliders, which often lead to artificial-looking results and clipped information.
Möhrle’s method underscores the notion that "small exposure shifts stacked across several masks read as natural depth, while one aggressive global slider reads as an edit." This distinction is crucial for achieving images that feel organically rich and dramatic rather than overtly processed. It’s a testament to the power of subtlety and the belief that the most impactful edits are often those that are least noticeable as edits themselves.
Implications for Contemporary Photography
Christian Möhrle’s tutorial transcends a mere technical demonstration; it offers a repeatable methodology that can be applied to almost any landscape scene featuring a bright sky and a darker foreground, especially those captured during the golden hour. The implications for photographers, from enthusiastic amateurs to seasoned professionals, are significant.
Firstly, it provides a clear roadmap for tackling one of photography’s most persistent challenges: dynamic range. By prioritizing a clean, detail-first base and then building contrast through targeted regional adjustments, photographers can consistently achieve results that maintain integrity across the tonal spectrum.
Secondly, it highlights the immense power and versatility of modern editing software. Lightroom’s masking panel, once a simpler tool, has evolved into a sophisticated suite capable of intricate selections and adjustments. Möhrle’s demonstration serves as an educational benchmark, encouraging photographers to delve deeper into these advanced functionalities rather than relying on automated or global presets.
Thirdly, it reinforces the enduring relevance of foundational photographic principles, connecting the digital workflow back to the wisdom of traditional darkroom practices. This blend of historical insight with cutting-edge technology empowers photographers to understand not just how to use the tools, but why certain techniques yield superior results.
In an era saturated with images, where visual impact is paramount, the ability to create photographs that are both dramatically compelling and technically flawless sets a high standard. Möhrle’s approach to mastering dynamic range in high-contrast scenes is a masterclass in achieving exactly that, proving that with precision, patience, and a deep understanding of light and shadow, photographers can truly bend the shadows and highlights without ever breaking them.
