
 By Nila Kartika Wati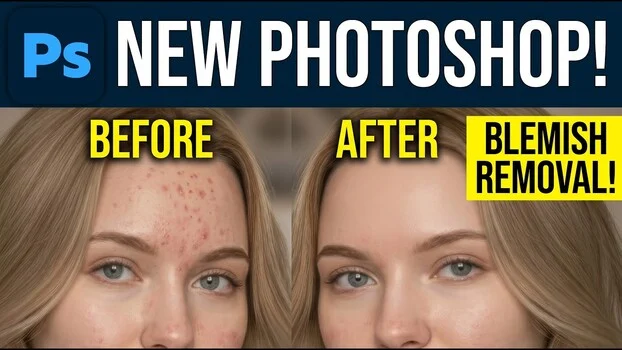
The digital photography landscape has long grappled with the challenge of achieving natural-looking skin retouching, a process often marred by tools that yield an artificial, "plastic" appearance. However, a significant advancement has emerged within Adobe Camera Raw, introducing a new blemish removal tool that prioritizes subtlety and user control, marking a pivotal shift in AI-assisted image editing. This innovation, meticulously detailed in a comprehensive walkthrough by photography educator Anthony Morganti, promises to empower photographers with the ability to refine skin texture without sacrificing authenticity, a critical demand in contemporary portraiture and editorial work.
The Evolution of Digital Skin Retouching
For decades, digital image manipulation software, particularly Adobe Photoshop, has offered various tools for skin enhancement, ranging from cloning and healing brushes to frequency separation techniques. While these methods provided granular control, they often required significant time and expertise to avoid undesirable effects like flattened skin texture, an overly smooth appearance, or the dreaded "uncanny valley" effect, where faces appear unnervingly artificial. The advent of artificial intelligence (AI) in image processing brought with it the promise of automation, yet early AI-driven retouching often fell into the trap of aggressive over-correction, leaving photographers with limited options to dial back the intensity. This created a persistent tension between speed and quality, forcing many professionals to stick to manual, time-consuming methods to maintain their artistic standards.
Adobe’s journey with AI, spearheaded by its Sensei platform, has seen a steady integration of intelligent features into its creative suite, from content-aware fill to sophisticated subject and sky selection tools in Lightroom and Camera Raw. The strategic pattern observed in these implementations is consistent: AI makes an intelligent first pass, providing a strong starting point, but critically, it then hands over fine-tuned control to the user through sliders and brushes. This philosophy, aimed at augmenting rather than replacing human creativity, is precisely what underpins the new blemish removal tool.
Unveiling the Camera Raw Blemish Removal Tool
Anthony Morganti’s tutorial serves as an essential guide to navigating this powerful new feature, starting with an unedited raw file and progressing through a full portrait edit. The tool’s integration into Camera Raw makes it accessible directly from Photoshop (via the Camera Raw filter) or Lightroom, streamlining the workflow for photographers who frequently process raw files.
To access the tool, users navigate to Camera Raw’s dedicated "Removal" section. Within this area, a new "Distraction Removal" category specifically labeled "Blemishes" houses the functionality. A single click on a checkbox activates the AI. In approximately ten seconds, Camera Raw leverages its AI algorithms to analyze the skin texture and intelligently identify and minimize blemishes. This speed represents a significant efficiency gain for photographers, particularly those managing large volumes of images from events, weddings, or studio sessions.
Subtlety as the Defining Characteristic
A key takeaway from Morganti’s demonstration, and indeed the tool’s most laudable attribute, is its inherent subtlety. Unlike previous iterations or third-party plugins that often applied aggressive smoothing by default, the new Camera Raw tool takes a remarkably light touch. At first glance, the before-and-after comparison, toggled by clicking the eye icon, appears almost identical. This deliberate under-correction is, as Morganti emphasizes, the entire point. It suggests that Adobe’s developers have listened to the long-standing feedback from the professional photography community, which has consistently advocated for tools that offer a natural baseline, allowing users to build upon it rather than having to aggressively reverse an over-processed result.
However, the seemingly minimal initial impact belies the significant work the AI has performed. Hitting the "Refine" button reveals a red overlay, marking the precise areas the tool has addressed. This visual feedback is crucial for understanding the AI’s intelligence and for guiding subsequent manual refinements.
Precision Controls: Amount and Fade Sliders
The tool offers two primary sliders for fine-tuning the outcome: "Amount" and "Fade." By default, "Amount" is set to 100, and "Fade" is at 50.
- Amount: This slider controls the intensity of the blemish removal. Pulling the "Amount" slider to the left will gradually bring back original skin texture, effectively reducing the cleanup if the AI’s initial pass was too strong or if a more rugged, less "perfect" look is desired. This is invaluable for preserving authentic skin details, such as subtle pores or fine lines, that contribute to a person’s unique character.
- Fade: The "Fade" slider dictates how permanent or temporary features are treated. Pushing this slider to the right increases the tool’s propensity to erase more permanent features, such as moles, scars, or birthmarks. Conversely, dragging it to the left will strengthen these features, ensuring they remain visible. This level of control is particularly important for editorial and documentary photography, where maintaining the subject’s true likeness and natural characteristics is paramount. For instance, a portrait photographer might use the "Fade" slider to soften the appearance of a scar without completely removing it, respecting the subject’s identity.
The Power of the Refine Brush: Restore and Remove
Beyond the global sliders, the tool provides a highly effective "Refine Brush" with two critical functions: "Restore" and "Remove." Morganti dedicates considerable time to explaining these, as they are often sources of confusion for new users.
- Restore: This acts as a negative brush. Painting with the "Restore" brush effectively undoes the blemish removal in the brushed area, bringing back the original blemish or skin texture. This is immensely useful for selectively reintroducing specific details that the AI might have inadvertently removed or softened too much, ensuring ultimate artistic control over the final image. For example, if the AI inadvertently smoothed an area that should retain more texture, the "Restore" brush can selectively bring it back.
- Remove: Conversely, the "Remove" button allows for manual intervention to catch any blemishes or distractions that the AI might have missed during its initial pass. This functions like a traditional spot healing brush, enabling photographers to target specific imperfections with precision. This hybrid approach – AI automation followed by precise manual refinement – represents the optimal workflow for achieving professional-grade results efficiently.
The Smart Object Workflow: A Cornerstone of Non-Destructive Editing
One of the most critical aspects of Morganti’s tutorial, and a practice that extends far beyond this specific tool, is the emphasis on non-destructive editing through "Smart Objects." This workflow is not merely a suggestion but a fundamental discipline that pays dividends across every filter and adjustment applied within Photoshop.
Morganti advocates for the following steps:
- Duplicate the Background Layer: By pressing Command + J (Mac) or Control + J (PC), the original background layer is duplicated. This preserves the original image data, acting as a safeguard.
- Convert for Smart Filters: Go to
Filter > Convert for Smart Filters. This action transforms the duplicated layer into a Smart Object. - Apply Camera Raw Filter: With the Smart Object selected, apply the Camera Raw filter (found under
Filter > Camera Raw Filter).
The immense benefit of this "Smart Object" approach is that any filter applied to it, including the Camera Raw filter, becomes a "Smart Filter." This means that the edits are not "baked in" permanently to the pixel data. Double-clicking the Camera Raw filter within the Smart Object layer later will reopen your edit exactly where you left off, allowing for endless adjustments and refinements without degrading the image quality. This stands in stark contrast to applying edits directly to the background layer, where modifications are permanent and difficult to reverse without starting over or relying on limited history states. For professional photographers, whose clients often request revisions, the Smart Object workflow is indispensable.
Multi-Person Editing and Advanced Masking
The tool’s intelligence extends to images featuring multiple subjects. Camera Raw automatically detects individual faces and displays separate face circles, offering the flexibility to edit each person separately or to apply global adjustments to all detected faces simultaneously. This granular control is vital for group portraits or family photos where each individual might require slightly different levels of retouching.
Morganti’s tutorial culminates in a full start-to-finish portrait edit, which includes his advanced masking techniques, demonstrating how he manages up to eight separate masks across a single face. This highlights that while AI automates initial tasks, the nuanced artistry of a photographer, particularly in targeted adjustments to specific facial features, remains paramount for achieving truly exceptional results.
Broader Implications: Adobe’s AI Strategy and Industry Impact
The introduction of this sophisticated blemish removal tool is consistent with Adobe’s broader strategic direction of integrating generative and AI-driven features across its creative ecosystem. This approach, where the software provides an intelligent first pass and then empowers users with detailed sliders and brushes to dial back or refine the result, addresses a core need in the professional photography market.
For photographers specializing in headshots, family portraits, fashion, or editorial work—genres where faces need to convey authenticity and realism—a tool that initially under-corrects and allows for subsequent enhancement is inherently more trustworthy than one that starts at maximum intensity. This paradigm shift encourages a more collaborative relationship between the photographer and the AI, where the technology serves as an assistant rather than a replacement for human judgment.
The implications for the photography industry are significant:
- Increased Efficiency: Automated initial cleanup frees up valuable time for photographers, allowing them to focus on creative aspects, client interaction, or processing higher volumes of work.
- Enhanced Quality and Consistency: The subtle, controllable nature of the tool helps maintain skin texture and realism, leading to more natural and consistent results across a portfolio.
- Reduced Learning Curve for Basic Retouching: While advanced techniques still require skill, the AI’s baseline correction makes quality skin retouching more accessible to a wider range of photographers.
- Ethical Considerations: As AI retouching becomes more sophisticated, discussions around photographic authenticity and the ethical boundaries of image manipulation will intensify. Tools like this, which prioritize control and subtlety, offer a more responsible approach to enhancement.
- Workflow Modernization: The emphasis on non-destructive Smart Object workflows reinforces best practices, promoting flexibility and future-proofing edits.
Beyond Blemishes: A Holistic Approach to Portrait Editing
Morganti’s comprehensive tutorial extends beyond mere blemish removal, showcasing a holistic approach to portrait editing. He meticulously covers various aspects of facial and body enhancement, treating each as a distinct adjustment area:
- Facial and Body Skin: Even after AI blemish removal, Morganti explains the necessity of further masking facial skin for localized adjustments to tone, color, or luminosity.
- Eyebrows, Sclera, Iris, Pupil, Lips, Teeth, Hair, and Clothing: Each of these elements receives dedicated attention, demonstrating how targeted adjustments can elevate the overall portrait. For example, he illustrates techniques for enhancing eye sparkle without appearing unnatural, or for subtly brightening teeth.
- Taming Shine: Without a dedicated "shine removal" slider, Morganti demonstrates how to effectively reduce unwanted shine by strategically manipulating highlights, whites, shadows, and blacks. This technique highlights the importance of understanding the fundamental exposure controls for nuanced adjustments.
- Challenges with Brown Eyes: He also flags a common challenge: brown eyes often resist detail enhancement more than lighter-colored eyes, offering practical insights into managing expectations and applying appropriate techniques.
- AI Edit Status Icon: Morganti points out the AI edit status icon, which serves as a warning when masks might need rebuilding after a blemish edit. Interestingly, he notes that while the icon is a helpful indicator, his own order of operations did not always result in the expected impact on the final image, underscoring the dynamic and sometimes unpredictable nature of AI integration.
- Color Correction After Retouching: A crucial segment of his video addresses the common issue of a retouched face ending up with an incorrect color cast, providing a fix that is essential for maintaining natural skin tones.
Conclusion
Adobe’s new AI blemish removal tool in Camera Raw represents a significant step forward in digital portrait retouching. By prioritizing subtlety, offering granular control, and integrating seamlessly into a non-destructive workflow via Smart Objects, it addresses many of the long-standing frustrations photographers have had with automated skin enhancement. Anthony Morganti’s detailed walkthrough not only demystifies the tool but also champions a disciplined, professional approach to image editing that balances the speed of AI with the precision of human artistry. This innovation is poised to elevate the standard of digital portraiture, allowing photographers to deliver natural, authentic, and impeccably refined images to their clients, while also reinforcing the critical value of human expertise in an increasingly AI-driven creative landscape.
