
Embarking on the quest to photograph the night sky is a pursuit that marries artistic vision with technical precision, presenting both exhilarating rewards and significant challenges. This comprehensive guide delves into the intricate planning, essential gear selection, and precise settings required to capture the awe-inspiring beauty of the cosmos, drawing on established best practices and technological advancements in the field of astrophotography. For many, the transition from urban environments, perpetually bathed in the orange glow of artificial illumination where only a handful of stars pierce the light-polluted haze, to the pristine darkness of remote locations transforms the night sky from a distant spectacle into a palpable, living presence. This shift underscores the profound impact of dark sky preservation on both astronomical observation and the deeply human connection to the universe.
The practice of astrophotography has evolved dramatically since its inception, moving from early attempts with long-exposure photographic plates in the late 19th century to today’s sophisticated digital imaging. Early pioneers like Henry Draper, who captured the first spectrum of Vega in 1872, laid the groundwork for a discipline that now combines cutting-edge camera sensors, advanced optics, and powerful post-processing software. This evolution has democratized astrophotography, making it accessible to enthusiasts while simultaneously pushing the boundaries of what professional observatories can achieve. The drive to capture faint nebulae, distant galaxies, and the intricate details of our own Milky Way continues to fuel innovation in equipment and technique.
Strategic Planning for Celestial Capture
Successful astrophotography hinges on meticulous planning, extending far beyond merely pointing a camera skyward. The aim is to create compelling compositions that tell a story, connecting terrestrial elements with the celestial tapestry above. This requires strategic location scouting and precise timing.
Selecting Optimal Locations: Escaping the Light Vortex
The primary antagonist of astrophotography is light pollution. Artificial light scattered by the atmosphere obscures faint celestial objects, drastically reducing the visibility of stars and galaxies. Identifying locations far removed from urban centers is paramount. The Bortle Dark-Sky Scale, a nine-level numerical scale, quantifies the darkness of a night sky, with Class 1 representing the darkest skies found on Earth and Class 9 denoting inner-city skies. Astrophotographers actively seek locations rated Bortle Class 1-4.
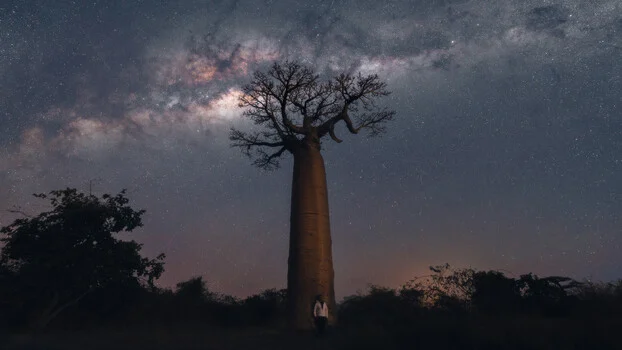
Such sanctuaries often include national parks, designated dark-sky preserves by organizations like the International Dark-Sky Association (IDA), or remote wilderness areas. For instance, regions like the Cederberg Mountains in South Africa, renowned for their ancient rock formations, offer an ideal fusion of dramatic foreground elements and exceptionally dark skies. Incorporating interesting terrestrial features—such as ruins, distinctive geological formations, or solitary trees—into the foreground provides depth and narrative, bridging the vastness of space with a tangible sense of place. This compositional strategy helps viewers connect emotionally with the image, transforming a mere "photo of dots" into a captivating scene.
Timing the Galactic Core: A Seasonal Spectacle
The Milky Way, our home galaxy, is not a static backdrop. Its most prominent feature, the Galactic Core—a bright, densely packed region of stars and gas—is visible only during specific seasons and times of night, its appearance dictated by Earth’s orbit and rotation. In the Northern Hemisphere, the Galactic Core is typically visible from late winter to early autumn, peaking in visibility during summer months. Conversely, in the Southern Hemisphere, it becomes visible earlier in the year, from early autumn to late spring, with peak visibility during winter.
Specialized planning applications are indispensable tools for predicting celestial alignments. PhotoPills, for example, has become an industry standard. This mobile application provides detailed information on the rise and set times of the sun, moon, and Milky Way core, as well as its precise position in the sky at any given date, time, and GPS coordinate. Its augmented reality (AR) mode allows photographers to visualize the Milky Way’s path over a chosen composition from the comfort of their home, enabling precise planning of camera angles and foreground elements without the need for on-site reconnaissance during inconvenient hours. This level of foresight minimizes wasted effort and maximizes the chances of capturing the desired shot. Other valuable tools include Stellarium and The Photographer’s Ephemeris, offering similar predictive capabilities.
Essential Equipment for Astrophotography
The right gear forms the bedrock of successful astrophotography, particularly equipment optimized for low-light performance and stability.
Camera Body: The Low-Light Workhorse
A camera with excellent high ISO performance is crucial. In the minimal light conditions of night photography, sensors require significantly boosted sensitivity, moving from typical daylight settings of ISO 50 or 100 to ISO 1600, 3200, or even 6400 and beyond. While high ISO inherently introduces digital noise, resulting in grainier images, modern full-frame cameras with larger sensors and advanced backside-illuminated (BSI) sensor technology excel at minimizing noise while preserving detail. Models from manufacturers like Sony (e.g., a7S series, a7R series), Nikon (e.g., D850, Z series), and Canon (e.g., EOS R series) are frequently favored by astrophotographers for their robust low-light capabilities. Some dedicated astrophotography cameras even feature active cooling systems to further reduce thermal noise during long exposures.
Lenses: Aperture and Focal Length are Key
The choice of lens profoundly impacts the quality and scope of astrophotography.
- Wide-angle Lenses (14-24mm): These are indispensable for capturing the vast expanse of the night sky and incorporating compelling foregrounds. A wide field of view allows for expansive Milky Way panoramas or meteor shower captures.
- Fast Aperture: The speed of a lens, defined by its maximum aperture, is non-negotiable. Lenses with wide apertures, such as f/2.8, f/1.8, or even f/1.4, are highly sought after. A wider aperture allows more light to reach the sensor in a shorter exposure time, which is critical for minimizing star trails and capturing fainter details.
- Telephoto Lenses (70mm+): While wide-angle lenses dominate landscape astrophotography, telephoto lenses with focal lengths of 200mm or more are excellent for isolating and magnifying specific celestial targets, such as the Galactic Core, larger nebulae, or the Andromeda galaxy. These require precise tracking mounts due to the magnified effect of Earth’s rotation.
- Optical Quality: Beyond aperture, lens quality matters. Astrophotographers prioritize lenses with minimal optical aberrations, such as coma (which distorts stars into "seagulls" or "comets" at the edges of the frame) and chromatic aberration (color fringing). Specialized "astro" lenses are designed to mitigate these issues.
Other Essential Gear:
- Sturdy Tripod: Non-negotiable for long exposures, ensuring absolute stability. Carbon fiber tripods offer a good balance of stability and portability.
- Remote Shutter Release: Prevents camera shake during exposure and allows for hands-free operation. Wired or wireless options are available.
- Star Tracker/Equatorial Mount: For deep-sky astrophotography or very long single exposures, a star tracker (a motorized mount) is essential. It counteracts Earth’s rotation, allowing stars to remain pin-sharp even with exposures lasting several minutes, revealing fainter details not possible with static tripods.
- Headlamp with Red Light Mode: Preserves night vision. White light can instantly ruin your own and others’ dark adaptation.
- Extra Batteries: Long exposures and cold temperatures rapidly drain batteries.
- Dew Heater/Strap: Prevents condensation from forming on the lens, which can blur images.
- Intervalometer: Built-in or external, useful for capturing multiple frames for stacking or time-lapses.
- Portable Power Bank: For charging cameras, phones, and dew heaters in remote locations.
Achieving Pin-Sharp Focus in Darkness
Accurate focus is paramount in astrophotography, where even slight inaccuracies can render stars as soft blobs. Manual focusing is standard practice, as autofocus systems struggle in extremely low light.
Understanding Hyperfocal Distance
Hyperfocal distance is the focusing distance that yields the maximum depth of field, ensuring everything from a specific near point to infinity is acceptably sharp. This is particularly useful for landscape astrophotography where both a foreground and the distant stars need to be in focus. Tools like PhotoPills can calculate the hyperfocal distance for any given lens, camera, and aperture combination. For example, with a 14mm lens on a full-frame camera at f/2.8, the hyperfocal distance might be around 2 meters. This means if the nearest foreground element is positioned at least 2 meters away, both it and the stars will be in focus.
Manual Focusing Techniques
- Live View Zoom: The most common method involves using the camera’s live view mode, zooming in digitally (e.g., 5x or 10x) on a bright star or distant light source. Manually adjust the focus ring until the star appears as the smallest, sharpest point of light possible.
- Bahtinov Mask: This specialized focusing aid, placed over the front of the lens, creates a distinctive diffraction spike pattern around bright stars. When the spikes form a perfectly symmetrical "X" with a central line, focus is achieved. This is highly precise and recommended for critical focusing.
- Infinity Mark (with caution): While lenses often have an infinity mark, it’s rarely precise enough for astrophotography. Focus slightly back from the hard stop to compensate for manufacturing variations and temperature changes. Always verify with live view.
Camera Settings for Capturing the Night Sky
Mastering the exposure triangle (ISO, aperture, shutter speed) is critical for astrophotography, with specific considerations for capturing celestial objects.
Aperture: Wide Open for Maximum Light
As previously mentioned, the aperture should be set to its widest possible value (e.g., f/2.8, f/1.8, f/1.4) to maximize light gathering. This minimizes exposure time, crucial for preventing star trails and capturing faint details.
Shutter Speed: The NPF Rule and Star Trails
The Earth’s rotation causes stars to appear to move across the sky. Long exposures will record this movement as star trails. To capture stars as pin-sharp points, shutter speed must be limited. The traditional "500 Rule" (500 / focal length = maximum shutter speed in seconds for full-frame cameras) provides a rough guideline. However, a more precise calculation is the "NPF Rule" (Nikonians, PhotoPills, Fstoppers Rule), which accounts for pixel density, aperture, and declination. The NPF Rule yields shorter shutter speeds, typically ranging from 10-25 seconds for wide-angle lenses, to ensure truly "pin-sharp" stars. For instance, PhotoPills might calculate an 11.81-second exposure for "barely noticeable trails" and 5.90 seconds for "pin-sharp" stars with a 14mm lens at f/1.8 on a Sony a7R IV. This rule is invaluable for precise planning.
ISO: Balancing Light Gathering and Noise
ISO settings will be significantly higher than daylight photography, typically ranging from ISO 1600 to 6400 or even higher. The goal is to collect enough light without introducing excessive noise.
Understanding ISO Invariance
ISO invariance is a crucial concept for modern digital sensors. It describes a sensor’s characteristic where the signal-to-noise ratio in the shadows remains largely consistent whether the exposure is boosted in-camera via a high ISO setting or in post-processing. For cameras that are ISO invariant (many modern Sony, Nikon, and Fuji sensors exhibit this), it can be advantageous to shoot at a lower ISO (e.g., ISO 800-1600) to preserve highlight detail and prevent clipping. Shadows can then be brightened significantly in post-processing with minimal additional noise compared to shooting at a much higher in-camera ISO. This provides greater flexibility in managing dynamic range, particularly when dealing with bright foregrounds and faint skies. Conversely, cameras that are not ISO invariant benefit more from higher in-camera ISO settings to "expose to the right" (ETTR), pushing histogram data to the brighter side to improve signal-to-noise ratio. Researching your specific camera’s ISO invariance characteristics is highly recommended.
White Balance and File Format
- White Balance: Set manually, typically to Tungsten (3200K) or Kelvin (3500-4000K), or even specific values like 3900K, to cool the image and reduce the orange glow from distant light pollution. This can be fine-tuned in post-processing.
- RAW File Format: Always shoot in RAW. This format captures the maximum amount of image data from the sensor, providing far greater flexibility for adjustments in post-processing compared to JPEGs, which compress and discard data.
Advanced Techniques for Enhanced Astrophotography
Beyond basic settings, several advanced techniques can dramatically improve the quality and impact of astrophotography.
Image Stacking for Noise Reduction
One of the most effective ways to combat noise and enhance detail in astrophotography is image stacking. This involves taking multiple identical exposures (e.g., 10-20 shots of 15-20 seconds each) and then combining them in specialized software (e.g., DeepSkyStacker, Sequator, Starry Landscape Stacker). The software aligns the stars and averages the pixel data, significantly reducing random noise while preserving signal, resulting in a much cleaner, more detailed final image. This technique is particularly valuable for deep-sky objects and Milky Way panoramas.
Star Tracking for Deep-Sky Objects
For capturing faint nebulae, galaxies, or highly detailed shots of the Milky Way core, a star tracker (equatorial mount) is indispensable. By precisely counteracting Earth’s rotation, these motorized mounts allow for much longer exposures (minutes instead of seconds) without star trailing. This enables the camera sensor to gather significantly more light, revealing intricate structures and colors that are otherwise invisible. When using a tracker, the foreground typically needs to be captured in a separate, shorter exposure and then blended with the tracked sky image in post-processing.
Focus Stacking for Foreground Detail
If the foreground is very close and a wide-angle lens at a wide aperture doesn’t provide sufficient depth of field for both foreground and stars, focus stacking can be employed. This involves taking multiple exposures of the foreground, each focused at a different distance, and then blending them in post-processing to create a single image with extended depth of field. This composite approach ensures both the nearest foreground elements and the distant celestial objects are perfectly sharp.
Building the Image in Post-Processing
Post-processing is an integral and often transformative phase in astrophotography, allowing photographers to extract hidden details and refine the aesthetic qualities of their captures. The raw files, while rich in data, often appear flat and underexposed to the naked eye.
Layer-Based Editing and Masking
The "secret" to professional-grade astrophotography post-processing lies in non-destructive, layer-based editing and meticulous masking. Instead of applying global adjustments, photographers create separate layers for different elements of the image: the sky, the foreground, specific celestial objects (like the Milky Way core), and even individual light-painted elements. Masks are then used to selectively apply adjustments to these layers, preventing changes in one area from affecting another. This allows for precise control over exposure, contrast, color, and noise reduction in each distinct part of the composition.
Key Post-Processing Steps:
-
Initial Adjustments (Lightroom/Camera Raw):
- White Balance Correction: Fine-tune the color temperature to achieve natural-looking stars and skies, often leaning towards cooler tones.
- Lens Corrections: Apply profile corrections to remove vignetting and optical distortions.
- Exposure and Contrast: Adjust global exposure to bring out details, and increase contrast to add punch.
- Highlight/Shadow Recovery: Recover details in bright stars and deep shadows.
- Noise Reduction: Apply initial luminance and color noise reduction, being careful not to over-soften details.
-
Advanced Editing (Photoshop/PixInsight):
- Layer Separation: Separate the sky and foreground into distinct layers using selection tools and masks.
- Sky Enhancement:
- Levels and Curves: Precisely adjust the tonal range of the sky to deepen blacks and brighten the Milky Way.
- Saturation and Vibrance: Enhance the colors of nebulae and the Milky Way, often targeting specific hues.
- Star Reduction: A common technique to subtly reduce the size and intensity of overly bright stars, making fainter details more prominent.
- Dodge and Burn: Selectively lighten or darken areas of the Milky Way core for added dimensionality.
- Foreground Processing:
- Exposure and Contrast: Adjust foreground elements to match the luminosity of the sky, often requiring light painting in the field or careful blending.
- Sharpening: Apply localized sharpening to foreground details.
- Color Grading: Ensure color harmony between the foreground and sky.
- Noise Reduction (Targeted): Apply more aggressive noise reduction to specific areas, like deep shadows, while preserving detail in brighter regions.
- Compositing (if applicable): Seamlessly blend tracked sky images with static foreground images, or multiple focus-stacked foreground images. The example of combining three shots—one for a person on a rock, one for light painting an arch, and one for the overall scene—demonstrates the power of compositing to create a hyper-realistic yet artistically compelling image.
Professional tutorials, such as the Fstoppers series "Photographing the World: Landscape Photography and Post-Processing" and "Photographing the World 2: Cityscape, Astrophotography, and Advanced Post-Processing," offer invaluable guidance for deepening skills in these advanced post-processing techniques.
Broader Impact and Final Remarks
Astrophotography is more than just a technical pursuit; it is an all-encompassing adventure that bridges art and science. Every phase—from the initial planning of the location and precise timing, to selecting the right gear, determining optimal settings, perfecting the composition, and finally, the intricate editing process—is equally critical and demands meticulous attention. While the experience can be physically demanding, often involving long nights in freezing temperatures, the rewards are profound.
Beyond personal artistic fulfillment, astrophotography plays a significant role in public science communication. By capturing and sharing stunning images of the universe, photographers inspire curiosity, foster a sense of wonder, and raise awareness about critical issues like light pollution. These images serve as a powerful reminder of our place within the vast cosmos, encouraging a deeper appreciation for astronomy and environmental conservation. The growth of astrotourism, driven by the desire to experience and photograph dark skies, also contributes to local economies in remote areas. In essence, astrophotography allows us to not only document the universe but also to share its boundless beauty, igniting a passion for exploration and discovery in countless others.