
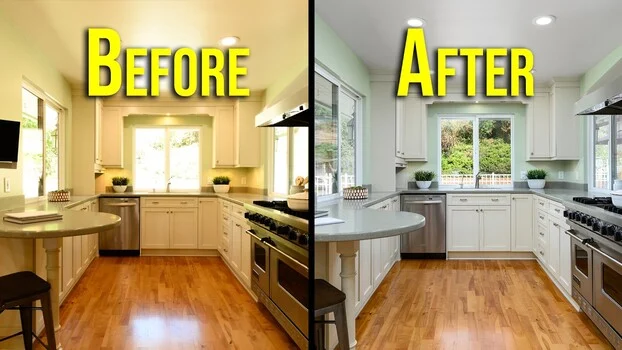
Achieving precise white balance in interior real estate photography presents a complex challenge that frequently confounds even seasoned professionals. The intricate interplay of disparate light sources, the subtle and overt influence of colored walls, and the deceptive reflectivity of various surfaces conspire to distort color rendition, making global corrections in post-production an often-insufficient remedy. The integrity of property visuals, crucial for effective marketing, hinges on accurately depicting these interior spaces.
The pursuit of true-to-life color, free from distracting casts and inaccuracies, is paramount in an industry where visual presentation directly correlates with buyer interest and perceived value. Industry data consistently underscores the profound impact of high-quality photography on real estate listings. A 2018 study by the National Association of Realtors (NAR) revealed that 87% of homebuyers found photos "very useful" in their home search, with listings featuring professional photography selling 32% faster and for up to $3,000-$11,000 more than comparable homes with amateur shots. Inaccurate white balance, leading to unnatural color casts, can undermine this critical first impression, misrepresenting a property’s ambiance and potentially deterring prospective buyers.
Renowned photography educator Nathan Cool, through his popular platform Nathan Cool Photo, has articulated a pragmatic three-step system designed to demystify this complex aspect of real estate photography. His methodology, applicable across various shooting techniques including High Dynamic Range (HDR), flambient (flash ambient blend), and single exposures, provides a structured approach to securing consistent and accurate colors from capture through final output. This system addresses the inherent difficulties of mixed lighting environments, which include natural daylight streaming through windows, artificial illumination from various bulb types (incandescent, LED, fluorescent, halogen), and the pervasive influence of wall colors and reflective materials.
The Criticality of Color Accuracy in Real Estate Marketing
The human perception of color is deeply intertwined with emotion and judgment. In the context of real estate, colors evoke feelings of warmth, spaciousness, modernity, or datedness. A living room that appears excessively yellow due to incorrect white balance might be perceived as dingy or poorly lit, while a kitchen with an unnatural blue cast could feel cold and uninviting. Such visual distortions not only create a misleading impression but can also lead to buyer disappointment upon physical viewing, increasing the likelihood of wasted showings and prolonged listing periods.
The unique environment of interior spaces amplifies white balance challenges. Unlike outdoor scenes, which primarily contend with a single dominant light source (the sun, varying in color temperature throughout the day), interiors are a melting pot of competing illuminants. Sunlight, with its broad spectrum of color temperatures (from cool blues in the morning to warm oranges at sunset), often mixes with interior artificial lights, each possessing a distinct color temperature (e.g., warm 2700K incandescent, neutral 4000K LED, cool 6500K fluorescent). Moreover, the interplay of light reflecting off colored walls—a red wall casting a magenta hue, a green wall imparting a greenish tint—further complicates the task of achieving neutral, balanced colors. Reflective surfaces like polished floors, mirrors, and stainless steel appliances can also pick up and amplify these disparate color casts, scattering them across the frame. Correcting these anomalies globally in post-production often results in compromises, fixing one area only to degrade another.
Step One: Establishing the Foundation In-Camera with Manual Kelvin
Cool’s system begins with a fundamental principle: proactive color management at the point of capture. He strongly advocates for setting a manual Kelvin value on the camera, rather than relying on the camera’s automatic white balance (AWB) function. The AWB system, while remarkably advanced in modern cameras, is fundamentally designed to approximate a neutral white in a wide range of general scenarios. However, the complex, mixed-lighting environments typical of real estate interiors consistently "fool" AWB algorithms. The camera’s processor attempts to find an average or dominant color temperature, often resulting in a passable but rarely precise white balance that still carries subtle, undesirable color casts.
Manual Kelvin input offers unparalleled control. Photographers can directly dial in a specific color temperature (measured in Kelvin, K) that best neutralizes the dominant light source or achieves a desired aesthetic. For instance, an incandescent-lit room might benefit from a Kelvin setting around 2800K-3200K, while a brightly daylit space could require 5000K-5500K. The key advantage here is consistency: once a Kelvin value is set, every subsequent shot under similar lighting conditions will maintain that exact color temperature, providing a stable foundation for post-processing.
The process involves selecting "Kelvin" or "Color Temp" in the camera’s white balance menu and adjusting the value while observing the live preview on the camera’s rear LCD screen. This real-time feedback allows for immediate visual assessment, enabling the photographer to get remarkably close to an accurate white balance before any files are even transferred to a computer. This pre-emptive correction significantly reduces the workload in post-production, transforming what might have been a "full rescue" operation into minor, nuanced adjustments. For scenarios with particularly complex mixed lighting where a single Kelvin value might not suffice, some professional photographers employ a custom white balance setting using a gray card or Expodisc, which provides an even more precise in-camera baseline by sampling the actual light hitting the scene. This initial precision is critical, whether the photographer handles editing in-house or outsources to a professional retouching service, as it streamlines the entire workflow.
Step Two: Precision Refinement in Lightroom Classic – Pre-Blending Calibration
The second phase of Cool’s methodology transitions to post-production, specifically within Adobe Lightroom Classic, focusing on meticulous manual temperature and tint adjustments to the raw files. The choice of raw files is non-negotiable here; raw formats retain the maximum amount of image data, allowing for far greater flexibility and non-destructive adjustments to white balance, exposure, and color compared to compressed JPEG files.
Before any blending of bracketed exposures (for HDR or flambient techniques) commences, Cool emphasizes the importance of applying precise white balance corrections to each individual raw file. A critical technique highlighted is his departure from the conventional white balance eyedropper tool. While the eyedropper can provide a quick estimate by sampling a neutral gray point, it often fails in complex interior scenes because a single sample point might not represent the overall lighting condition or might itself be influenced by a subtle color cast.
Instead, Cool advocates for a more analytical approach: moving the cursor across various areas of the frame while observing the RGB values displayed beneath the histogram in Lightroom. This real-time numerical feedback provides a granular understanding of the color distribution in any given area. By comparing the Red, Green, and Blue values, a photographer can identify imbalances—for example, a dominance of green in a seemingly neutral area indicates a green color cast. This allows for highly targeted adjustments using the Temperature (blue-yellow axis) and Tint (green-magenta axis) sliders to bring the RGB values closer to equilibrium in neutral areas, thereby achieving a more accurate and consistent white balance across the entire image.
The cardinal rule at this stage is consistency: whatever temperature and tint adjustments are made to one frame must be applied identically to every other frame intended for blending. This includes all ambient exposures (underexposed, correctly exposed, overexposed) and any flash exposures. Failing to apply consistent white balance across all layers before blending will result in color shifts and discrepancies in the final composite image, leading to a patchwork of uneven tones that are incredibly difficult to rectify later. This uniformity ensures a seamless integration of light and color during the subsequent blending stage in Photoshop.
Step Three: Surgical Color Correction in Photoshop – Layer-Based Precision
The final and most nuanced stage of Cool’s system unfolds in Adobe Photoshop, where precision takes precedence over global adjustments. At the blending stage, where multiple exposures are combined, color corrections are applied surgically to specific layers that require them, rather than indiscriminately across the entire composite. This approach recognizes that different parts of an interior scene may still harbor subtle color casts even after initial white balance steps, especially areas influenced by highly colored objects or specific light sources.
For instance, Cool illustrates using a clipping mask to limit a warmth and magenta adjustment to a "shower pop" layer—a specific flash exposure designed to brighten the shower area. A clipping mask ensures that this adjustment only affects the pixels of the layer directly beneath it, preventing the warmth and magenta from bleeding into other parts of the image where it might be unwanted. This level of control allows for targeted color enhancement without introducing new problems elsewhere.
Similarly, to address excess green in the broader image (perhaps from reflections off foliage outside a window or a green wall), a separate hue/saturation adjustment layer can be employed. Crucially, this adjustment would be applied with a precise mask that excludes areas like cabinets or furniture that might already have accurate color, preventing them from being desaturated or shifted incorrectly. This meticulous masking ensures that only the problem areas are treated, maintaining the integrity of the rest of the image.
A paramount consideration at this stage is layer order. Any color corrections for the interior elements must reside below the window pull layers in the Photoshop stack. Window pull layers, which are often separate exposures or masked selections designed to correctly expose the exterior view through windows, are carefully processed to achieve accurate color and brightness for the outside scene. If interior color correction layers are placed above these window pulls, they will inevitably shift the colors of the exterior view, undoing the work already performed to get the outside right. This structural hierarchy is vital for maintaining the intended aesthetic and accuracy of both interior and exterior elements within the final composite.
The ultimate step involves creating a stamped layer (a merged copy of all visible layers) and running it through the Camera Raw filter for final global finishing adjustments. The brilliance of Cool’s systematic approach is revealed here: because the color work has been meticulously executed at each preceding stage, the photographer should find little to no need to touch the color sliders (temperature, tint, hue, saturation) within the Camera Raw filter. This final pass focuses on global contrast, sharpness, noise reduction, and perhaps subtle vignette or grain, confident that the underlying color fidelity is already established.
Broader Industry Impact and Implications
Nathan Cool’s three-step system for white balance mastery has significant implications across the real estate photography ecosystem.
-
For Photographers: Adopting such a disciplined methodology elevates professional standards. It reduces the reliance on guesswork and extensive, often frustrating, trial-and-error in post-production. By front-loading precision into the capture and initial editing stages, photographers can significantly streamline their workflow, reduce overall editing time, and deliver consistently superior results. This technical mastery enhances a photographer’s reputation, attracting more discerning clients and commanding higher rates. In a competitive market, the ability to consistently produce images with accurate, appealing colors serves as a distinct competitive advantage.
-
For Real Estate Agents and Brokers: The immediate benefit is enhanced marketing collateral. Properties showcased with true-to-life colors are more appealing, generate greater online engagement, and accurately set buyer expectations. This can translate into faster sales cycles, potentially higher selling prices, and a reduction in the number of unproductive property viewings caused by misrepresentation in photographs. Agents can present listings with greater confidence, knowing that the visual assets are a true reflection of the property’s quality and ambiance.
-
For Property Sellers and Buyers: Sellers benefit from their properties being presented in the best possible light, attracting a wider pool of serious buyers. Buyers, in turn, gain a more authentic understanding of a property before committing to a viewing, minimizing wasted time and effort. This fosters trust in the real estate market, as visual information becomes a more reliable guide.
The increasing sophistication of digital photography tools and the demand for high-quality visual content in the digital age underscore the ongoing evolution of real estate photography. Mastering fundamental techniques like white balance, as outlined by experts like Nathan Cool, remains a cornerstone of professional practice. It is not merely about making an image look "good," but about ensuring it is "accurate" and "consistent," thereby serving its primary purpose as an effective and truthful marketing tool in the dynamic real estate landscape. The systematic approach advocated by Cool provides a clear roadmap for photographers to navigate the complexities of interior lighting, ultimately contributing to a more transparent and effective real estate market.