 By Jia Lissa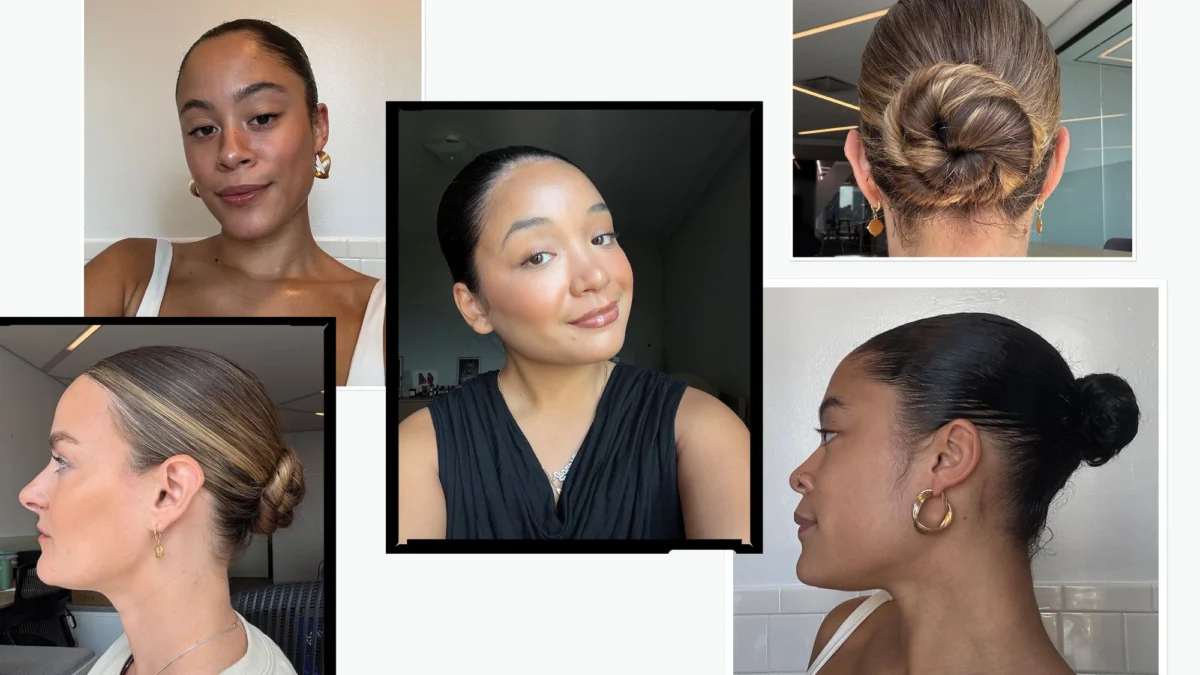
The seemingly effortless slicked-back bun, a symbol of chic, model-off-duty style, often presents a frustrating reality for those attempting to recreate it. What appears to be a simple act of gathering hair and twisting it into a knot frequently devolves into a lengthy battle against stubborn flyaways, unsightly bumps, and a general lack of polish. The very essence of this sophisticated updo lies in its immaculate finish, where every strand is precisely in place, creating an illusion of casual elegance that can feel impossibly out of reach. However, achieving this coveted look does not necessitate Herculean strength or the acquisition of an extra limb. With the right application of styling products, strategic use of tools, and a nuanced understanding of hair types, the elusive perfectly sleek bun is well within your grasp. This comprehensive guide, drawing on insights from seasoned hairstylists and experienced editors, breaks down the process step-by-step, offering tailored advice to ensure a smooth, polished outcome, regardless of your hair’s texture or type.
The journey to a flawless slicked-back bun begins long before the hair is gathered. A crucial preparatory phase, tailored to individual hair needs, lays the groundwork for a smoother styling experience and minimizes potential damage. Renowned hairstylist Chris Russell emphasizes the importance of starting with a heat-protectant spray. This initial step is vital for safeguarding the hair from thermal damage, especially if hot tools are to be employed later in the styling process. Following the application of the protectant, Russell advises rough-drying the hair. This technique helps to remove excess moisture while preparing the strands for further manipulation. For those seeking to combat frizz and enhance shine, a product like the Bumble and Bumble Heat Shield Thermal Protection Hair Mist is a recommended choice, offering both protection and a smoother finish.

The use of a thermal brush, such as the Sutra IR Infrared Thermal Brush, is another key recommendation for achieving an even texture, controlled shine, and a seamless base. This tool is designed to distribute heat evenly, smoothing the cuticle and preventing the formation of unwanted bumps or unevenness. However, the adoption of hot tools post-drying is not a universal practice among those who master the slicked-back bun. Sophie Panych, Allure’s content director, whose hair is naturally fine and straight, occasionally employs a flat iron to refine her strands before styling. Conversely, Bianca Richards, the social media manager, whose thick, wavy hair requires significant smoothing, opts for a thermal brush like the Wavytalk Thermal Brush after blow-drying to achieve added sleekness. Hailey Roy, a commerce production assistant with 3C curls, champions a heat-free approach, prioritizing the natural texture of her hair and avoiding hot tools altogether. This highlights the adaptability of the slicked-back bun, demonstrating that different hair types can achieve the desired result through varied methods.
For hair that tends to be dry or prone to frizz, the application of a lightweight hair oil can be transformative. Stylist Kee Taylor suggests smoothing a small amount of oil through the mid-lengths and ends of the hair. This not only enhances manageability but also imparts a healthy sheen. Taylor cautions that "a little goes a long way, especially on finer hair," emphasizing the importance of moderation to avoid weighing the hair down. Hailey Roy, for instance, utilizes the Rïz Santa Lucia Heat Protectant Styling Hair Oil to seal out humidity and boost shine, a testament to its effectiveness. For individuals with curly or coily hair, maintaining a slight dampness with water can aid in detangling and facilitate a smoother pull-back, as recommended by stylist Justine Marjan. This initial preparation is paramount, setting the stage for the subsequent steps and ensuring a more controlled and aesthetically pleasing final look.
The Art of Gathering: Mastering the Pull-Back
The most common pitfall encountered when attempting a slicked-back bun is the inclination to pull all the hair back in a single, sweeping motion. Experts universally advise against this approach, instead advocating for a section-by-section strategy. This method allows for greater control and precision, ensuring that every strand is incorporated smoothly. Hairstylist Mandee Tauber suggests a radial part, originating from the crown of the head and extending to the tops of the ears, effectively dividing the hair into upper and lower sections. The lower section is then styled first, while the upper section remains secured out of the way. This methodical approach prevents hair from slipping and ensures a more uniform application of product and styling. Hailey Roy finds that the pointed tip of a parting comb, such as the Donna Professional Parting Pin Tail Comb, is instrumental in creating clean, even sections, a vital step for achieving a polished appearance.

For those with straight or straightened hair, the application of a pomade stick, like the BondiBoost Strawberry Gum Grip Styling Stick, directly along the hairline can provide excellent hold without the risk of flaking. This is followed by the use of a boar bristle brush, such as the Denman D81M Style & Shine Hair Brush. The boar bristles are particularly effective in creating the necessary tension to stretch and smooth the hair strands, as explained by Taylor. The brush is used with long, controlled strokes to "condense and refine" the hair, ensuring a seamless finish. Bianca Richards employs a combination of a comb, like the Céréd Parting Tail Comb, and a brush, the La Bonne Brosse N.01 The Universal Brush, to meticulously smooth her hair, ensuring no stray strands disrupt the sleek aesthetic. This dual-tool approach is particularly effective for achieving that coveted polished look.
When dealing with curly and coily hair, a more nuanced sectioning strategy is recommended. Taylor advises working in even smaller sections, meticulously smoothing each one individually before gathering them all together. This technique ensures maximum control without over-processing or damaging the hair. Instead of a pomade stick, Oribe Gel Sérum is often the product of choice for coils, applied generously around the hairline and then smoothed back with a boar bristle brush. For added security, Justine Marjan suggests a light mist of Paul Mitchell Firm Hold Super Clean Extra Hairspray on the roots before brushing, followed by a second elastic to secure the entire mass. While this might seem like a substantial amount of product, Taylor reiterates that "the key is to let the brush and styling product do most of the work rather than pulling excessively tight." This approach not only ensures a smoother finish but also minimizes stress on the scalp, preventing potential breakage or discomfort.
Chris Russell offers a specific guideline for ponytail placement, suggesting the crown of the head with the hair directed parallel to the cheekbones. This higher placement, he notes, creates a natural lifting effect, lending the face a "more sculpted, snatched appearance." However, it is important to acknowledge that the versatility of the slicked-back bun allows for personal preference in placement, with both high and low styles being equally effective and stylish.

Refining the Foundation: Polishing the Ponytail
Before transforming the ponytail into a bun, a crucial step involves preparing it for volume and ensuring a smooth exterior. Taylor Carter recommends dusting texturizing powder, such as IGK Beach Club Texture Powder, throughout the ponytail. This adds subtle grit and fullness, allowing for teasing of individual sections to create internal volume. Following this, the outer layer is lightly smoothed, and a finishing product like Color Wow Pop & Lock Serum is applied to maintain a shiny exterior and prevent the bun from appearing flat. Bianca Richards favors E.L.F. Gloss Mode Treatment Oil for its ability to impart an extra-gleaming finish to her ponytail, contributing to a luxurious and polished look.
For those desiring a more compact and tightly sculpted bun, Tauber suggests brushing a wax or gel stick through the length of the ponytail for straighter hair types. On curly or coily hair, a light mist of water followed by a hair gel, such as the Odele Flex Hair Gel, is recommended. This gel provides strong hold without creating a stiff or "rock-hard" texture. The final detailing of the hairline is often what elevates a slicked-back bun from good to exceptional. Chris Russell emphasizes using a flat iron to refine the hairline and then perfecting baby hairs with a toothbrush-like detailing tool. The Tymo Flaight Holo iron, known for its ability to combat frizz without tugging, and the DAE Dual-Edge Styling Brush, with its fine synthetic bristles, form a powerful combination for erasing flyaways and achieving a meticulously smooth finish.
The Art of the Wrap: Securing the Bun
The final stage of creating a slicked-back bun involves the artful wrapping and securing of the ponytail into a bun. While most stylists twist the ponytail before wrapping, the method of construction and securing varies significantly based on hair texture and the desired aesthetic. Mandee Tauber’s approach involves twisting the entire ponytail into a single, tight rope before coiling it around the base. For straighter hair, she tucks the ends underneath and secures the bun with a large U-pin, carefully weaving it through the bun and into the base for discreet support. For curly and coily hair, she opts for a large elastic to secure the completed bun, forgoing the U-pin for a more robust hold.

Sophie Panych, drawing on her background in dance, employs a streamlined technique for creating a flatter, more integrated bun. Instead of creating two separate ponytails, she divides a single ponytail into two sections. She then twists one section and wraps it around the elastic, followed by unpinning the second section and twisting it into the first, continuing the wrapping process and securing with U-pins. This method, she explains, "keeps it more secure because you’ve got both internal and external pins." Chris Russell, on the other hand, intentionally leaves the last inch or two of the ponytail exposed after wrapping the bun, a stylistic choice he makes to "give it a little personality" and maintain a modern aesthetic.
The Finishing Touches: Hold and Refinement
The final step in achieving a professional-looking slicked-back bun is to lock in the style and refine any minute details. Kee Taylor recommends applying a few drops of Céréd Restoring Hair & Edge Drops to smooth any residual frizz and add a touch of shine without stiffness. Taylor Carter often finishes with Davines This Is a Dry Wax Finishing Spray, which provides hold for the bun itself while maintaining a soft texture. Bianca Richards uses Rizos Curls Sleek Styling Cream + Taming Wand to touch up her hairline, ensuring a perfectly smooth edge. Hailey Roy opts for Got2B Glued Styling Spiking Glue to achieve a final slick-down at the base of her hair, reinforcing the polished look.
For coily hair, Justine Marjan offers an additional tip: after styling, wrapping the hairline in a silk scarf for at least 20 minutes can help set the style and prevent frizz. This practice, while time-consuming, can significantly enhance the longevity and neatness of the bun, particularly in humid conditions.

Ultimately, mastering the slicked-back bun, much like any sophisticated hairstyle, requires practice and patience. By understanding the nuances of hair preparation, strategic product application, and methodical styling techniques, individuals can transcend the frustration often associated with this seemingly simple updo. The wealth of knowledge shared by stylists and editors alike empowers anyone to achieve an expert-level sleek bun, transforming a potentially daunting task into a rewarding and repeatable beauty ritual. The key lies in embracing the process, experimenting with different products and techniques tailored to one’s unique hair type, and committing to the refinement that elevates a simple ponytail into a statement of polished elegance.
